One of my motos is never buy anything at full retail price. Call it cultural indoctrination, smart shopping, or frugality, but why spend $100 buying something when you can get the identical item for half the price? My wardrobe consists of Michael Kors, Express, The Limited, Banana Republic, Anne Taylor Loft and BCBG Max Azria, and not one single item was purchased at full retail. They weren’t even bought at less than a 40% discount. I may not ever achieve Extreme Couponing level, but I love a good deal! That is why we had a DIY wedding. This is where I put my design skills to use. Although the floral arrangements and floral decorations were all made by my close friend and wedding planner, the placeholders, save-the-date cards, wedding invitations, and wedding favors were all designed by me and handmade by myself and my (very patient) bridesmaids. I’ll be posting instructions for all of these to help you save money.
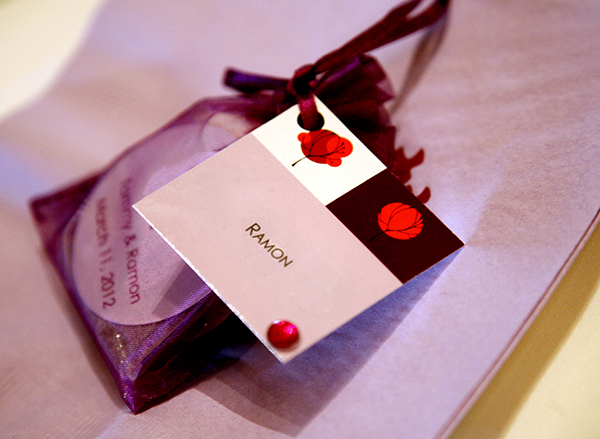
This was a Tazo Tea wedding favor doubled as a place card for the guests. We were able to complete this project with less than $100 for up to 100 guests by buying from Amazon and using Michaels 40% off coupons. These custom-made favors/place cards add a touch of creative personalization to your wedding without the outrageous cost.
You’ll Need:
- Enough tea bags to give two to each guest. We used bulk Tazo Lotus Tea Bags from Amazon.
- Small plastic bags to hold the tea bags together.
- Drawstring organza bags as a decorative pouch.
- Avery clear address labels (Label #15667) for guests’ name.
- Avery mailing seals (Label # 5247) to use as favor labels.
- 1-inch hole punch.
- Scrapbooking paper (each sheet of 12″x12″ scrapbooking paper yields about 25 1-inch hole punched dots).
- Multi-colored scrapbooking bead stickers. Get as many colors as the meal options at your wedding.
- Gift tags.
How To:
- Print each of the guest’s name on each Avery clear address label.
- Affix the labels with guests name onto the gift tag.
- OPTIONAL… Print the name of the tea you selected on a different set of the Avery clear address labels and affix on to the back of the gift tag.
- Stick a color bead on the lower right hand corner of the gift tag, based on the meal choice of each guest (we used red for beef, orange for chicken, and green for vegetarian).
- Print your name and your SO’s name along with your wedding date on the Avery round mail seals. Print enough for each tea bag you are giving away.
- Punch enough dots for each tea bag you are giving away.
- Cover the original tag of each tea bag by sticking the printed round mailing seals onto the scrapbook dots.
- Put two tea bags into the plastic bag to help retain freshness, then put them in the organza pouches.
- Tie the gift tag onto each organza pouch containing the tea bags.
Hope this gives you a bit of inspiration to create your own fabulous party or wedding favor. If you have any questions or would like help designing your personalized favors, leave a message in the comments below! Happy crafting 🙂


